Wednesday, January 20, 2010
Video of Interest
My friend Brad showed me this video. I love the way they discuss the compositions as well the sensory experiences:
Sunday, November 29, 2009
The Computer Lab:

 Our students will be doing "light, detailed work" on computers and would therefore require a range from 29" to 34" tall. The easiest way to achieve these heights is by having desks that have adjustable height on the fly. In an ideal world my computer lab would consist of motorized desks, such as this one, which has a simple two-button control center at the front for immediate adjustment:
Again, the computer lab is much easier to accommodate than a traditional darkroom. But, I strongly believe it should exist as a tool in addition to the darkroom and not as a shortcut.
The Cameras:
We use two cameras in our classroom, Canon Rebels:

And Pentax K1000's:

Both cameras are functionally similar, as far as having a lens, a viewfinder, and manual controls. The Canons are modern digital single lens reflex (SLR) cameras, complete with autofocus and automatic exposure. The Pentax is old and reliable, fully manual with no automatic features whatsoever.
Neither of these cameras should pose too great a challenge to an individual with mobility issues, assuming they have adequate control of their arms. The Canon is lighter and easier to use because of the automatic features, but the Pentax is less complex and requires little effort to use.
When we send students out to photograph, they always go out in pairs or trios, being as we don't have enough cameras for every student anyhow. Pairing students properly can help make sure a student can achieve the photographs they plan for and receive aid from a peer when necessary.
What if the students lack access to their arms?
There are a few instances where students arms will be occupied providing mobility, such as when using forearm crutches commonly used for long-term disabilities such as polio.
For a student in this position, the first adaptation I would propose would be camera chest-harness, to stabilize the camera at their waist and neck when walking. This would help students maintain balance, reducing the risk of injury to the student due to the camera swinging around.
If a student on crutches can stabilize themselves to stop and photograph, this harness should be an adequate accommodation.
For students that have limited use of their arms, there are a few more adaptations to consider:
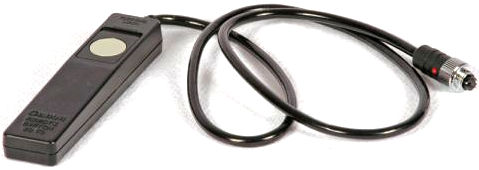
Tripods: Because our students are sent in pairs, you can pair your student with a peer who can help carry a tripod. With a good, sturdy tripod, the student can compose their images with added stability. In addition to the tripod, the camera can have a shutter release cable attached, which allows students to take a photograph with a small cable in their hand. Though the tripod may feel like a constraint to those without mobility disabilities, I feel it serves as an advantage for those that lack the stability or use of their arms.
Directorial Photography: Does the photograph have to be physically taken by a student for it be theirs? I believe in an approach that I'll call directorial photography. In this case, students can direct a peer or aid in what composition they are interested in creating. Shyness and communication are the most direct barriers in a situation like this, but an accommodation like this can provide an avenue for all students to participate in the making of images, even those with no vision.
There may be other adaptations that function in a similar fashion. There are small chest-mounted or helmet-mounted digital cameras available, but these do not allow for the use of traditional film formats– a must in a photography classroom.
Saturday, November 28, 2009
The Enlarger:

The enlarger is like the camera of the darkroom. Without an enlarger, we cannot make prints from our film. Our darkroom has 18 full size enlargers like the Omega pictured above. Set upon a standard, accessible counter, it stands roughly 6 1/2 feet tall (the enlarger itself being 4 feet). How can someone in a wheelchair utilize an enlarger to the fullest capacity?
The diagram below labels each essential element of an enlarger:

The following elements need to be accessible to all students:
- The easel: to hold your photographic paper in place.
- The focus knob: to bring your image into focus.
- The lens: to adjust the amount of light exposed to the paper.
- The height adjustment lever: to change the size of your enlargement.
- The negative carrier: to hold your film in place and project it onto the easel.
Use a motorized enlarger: Motorized enlargers utilize a button array to raise and lower the condenser head (the light source). By having this motorized system, all students can raise and lower the device to attain their desired print size. You can purchase an entire enlarger with a motorized chassis such as the Beseler 45V-XL, but at $3000 it is perhaps unattainable for most high school budgets. It is, however, highly probable to a find a used/retired motorized enlarger for a much lower price.
Place the enlarger on a lower level: If placed at lower height, perhaps 20 inches off of the ground (using whatever resources available– plywood, cinderblocks, stools, etc.), one would be able to reach all the necessity elements without the easel being too far down as well. I'm not too fond of this solution, but it serves as a feasible workaround for giving all students access.
Turn the enlarger ninety degrees and project: This is my favorite solution; enlargers can be mounted to a counter at a ninety degree angle, facing the wall rather than the floor. Mounting the enlarger to a surface in this matter eliminates any vertical movements and makes all necessary adjustments lateral. Here is an image of an enlarger set up in this way:

This set up is traditionally used for extra large printing (mural printing), but within a small space it can produce smaller, more common sized images. This method requires some modification to an enlarger station but is relatively inexpensive and the most functional.
Contemplating how to utilize an enlarger from the perspective of someone with a mobility disability is challenging, I found myself having to sit in a chair and stare at the enlarger. It truly helps to visualize the challenge as well as experience it, so that one may devise the absolute best adaptation.
Subscribe to:
Posts (Atom)